
A complete Guide on How to harvest lavender and then dry it to use, cut flower stalks, leaving 2-4 inches below the flowers. Gather into small bundles.and Hang
Listen to the guide
or read on . . .
DIY Lavender Harvesting is Easier Than You Think
After tending to your lavender all season long, it’s incredibly rewarding to finally harvest those aromatic purple buds for your own DIY projects. But when is the ideal time for lavender harvesting? And how exactly should you cut and dry your bountiful blooms to enjoy all year round? Follow this simple guide to DIY lavender harvesting and you’ll soon be stockpiling your own homegrown lavender.
With just a few basic materials and proper timing as your guide, you can easily gather armfuls of fresh lavender to create custom sachets, soaps, bouquets, and more. Learn pro tips for quick drying methods, ideal storage conditions, and avoiding common pitfalls. I’ll also inspire you with creative ways to put your homemade dried lavender to use. Read on to become a lavender harvesting pro!
When to Harvest Lavender
Timing is key when harvesting lavender to maximise the colour, fragrance, and oil content of the flowers. The optimal harvest window is when the buds on the flower spike are halfway open. This is just before they reach full bloom. Typically, lavender is ready for harvest in mid to late summer.
Check flower spikes daily as they near their peak bloom stage. Harvest in the morning after any dew has evaporated for the best oil concentration. Snip flower stalks with pruners or garden shears on a dry, sunny day. Avoid harvesting after recent rain, which dilutes the essential oils. Most varieties are ready to harvest from mid-July through August. With ideal timing, you’ll snip lavender at its aromatic peak.
Harvesting Tools and Materials
Having the right equipment on hand makes DIY lavender harvesting much easier:
– Gardening shears/pruners – Sharp bypass pruners minimise damage.
– Baskets/bags – Collect cut stems in breathable containers.
– Drying racks – Wire drying racks allow air circulation.
– Cheesecloth – Wrap bundles in cheesecloth or a coarse loosely woven cotton gauze, Muslin or netting during drying.
– Twine – Tie stems together and attach tags.
– Storage containers – Glass jars or zip-close bags for dried lavender.
– Labels – Identify varieties with dates and names.
– Clean surfaces – Use cloths to keep the work area tidy.
Avoid using plastic bags that trap moisture. Have all materials prepared in advance before beginning your lavender harvest for efficiency.
How to Cut Lavender
Cut flower spikes leaving at least 2-4 inches of stem length below the flowers. Keeping extra stems provides visual interest and allows you to tie bundles. Make cuts just above leaf sets or where stems branch off.
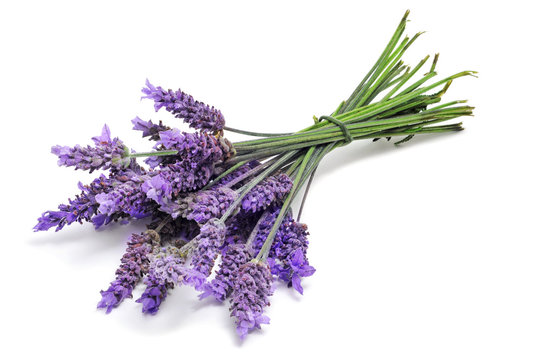
Remove any leaves or debris from flower spikes as you harvest. Gently rinse if needed. Gather 7-10 stems together and tie them with twine or a rubber band into small bundles. Use sharp bypass pruners for clean cuts that won’t crush stems.
Make an angled cut above leaf nodes to encourage new growth after harvest. Store freshly cut lavender in the shade or cool area until ready to dry. Cut back whole plants by a third after harvesting flower spikes. With good technique, you’ll have gorgeous lavender for arrangements and crafts.
Drying Lavender
To preserve aromatic oils, dry lavender quickly by hanging bundles or spreading them onto screens in a warm, dark space. Attics or spare rooms work well. Hang bundles from hooks or rods. Set those on screens on empty racks to allow air circulation.
Keep flowers out of direct light to prevent fading. Move dried lavender to a shelf or box after the stems are crisp but before completely brittle, usually 1-2 weeks. For wreaths and arrangements, leave stems pliable by drying for only 5-7 days.
For the best flavour, dry edible lavender on racks or mesh trays outside of direct sunlight. Bring indoors at night. Discard any bundles that develop mould. Proper air circulation and darkness produce the best-dried lavender.
Storing Dried Lavender
To maintain the aromatic quality and colour of dried lavender, store bundles in cool, dark spaces. Glass jars, tin containers, and opaque plastic bags work well for storage.
Prevent crushing by inserting sheets of parchment between layered bundles. For short-term storage up to a year, keep lavender in a cabinet or pantry. For a longer duration, choose the refrigerator or freezer.
When freezing, wrap bundles first in plastic then foil. Label bundles with the variety and harvest date for easy identification. Keeping dried lavender dry, cool, and away from light preserves the flowers’ fragrance and appearance.
Regularly check stored lavender for moisture buildup or spoilage. Removing old flowers as new harvests come in also retains scent in your dried lavender.
Uses for Dried Lavender
Once dried, homemade lavender lends its beauty and aroma to:
– Sachets for closets and dresser drawers
– Soap and candle-making crafts
– Potpourri blends with other dried flowers
– Sleep & relaxation pillows
– Wedding bouquets and floral arrangements
– DIY bath salts, oils, and spa products
– Culinary recipes for cookies, teas, and more
– Infused vinegars, sugars, honey
– Lavender lemonade and cocktails
With your freshly dried lavender, creativity is the only limit. Experiment with combining varieties for unique craft blends. Give homemade sachets or soaps as gifts. Brew relaxing herbal teas by the cup or pitcher. Your harvested lavender brings endless fragrant possibilities.
Common Issues to Avoid
When harvesting lavender, keep these guidelines in mind to prevent problems:

– Avoid harvesting after rain or morning dew for best oil content.
– Don’t harvest too early or late when oil concentration is weaker.
– Cut flower spikes, not just buds, leaving extra stem length.
– Dry thoroughly in darkness to prevent mould and fading.
– Check bundles frequently and discard any with moisture or mould.
– Prevent crushing by gently handling bundles and layers.
– For arrangements, use rubber bands instead of wire.
– Don’t overstuff storage containers. Allow airflow.
– Note varieties and dates for easier identification.
Follow proper timing, technique, and care for the highest quality DIY dried lavender you’ll love using in projects.
Final Thoughts
With the right approach, gathering your own lavender harvest can become a treasured annual tradition. As you brush your hand against fresh aromatic buds, you’ll feel proud of the bounty your garden provides. Hanging bundles to dry fills the house with calming fragrance. Experimenting with homemade lavender crafts fosters creativity and reflection during the cosy wintertime. Your personal touches will make gifts deeply meaningful.
Beyond tangible results, embrace the intangible joy lavender harvesting brings. Notice your slowed breath, relaxed muscles, and focused mind as you cut armfuls under the summer sun. Feel tension dissipate as you arrange dried varieties into beautiful hues and textures. Let the memories infuse each project – memories of nurturing your plants, watching hummingbirds flutter, and sharing silly jokes over tea on the porch.
More than just a harvest, lavender gathering becomes meaningful through mindfulness. Allow all your senses to be immersed as you follow lavender from seed, to bloom, to bouquet.
For tips on planting your own lavender garden, visit our Grow Lavender guide.